

This skill station covers:
Two-Curve theory
The 3-stage CCAM approach to tracheal intubation
Tracheal intubation (TI) is a core skill in critical care. CICM and ACEM Fellows report that they don’t perform the procedure often enough to maintain their confidence, and all critical care practitioners including anaesthetists worry about how they will manage in a difficult airway scenario.
For senior practitioners, years may have elapsed since they received supervised training in laryngoscopy. Theory, training techniques and airway equipment have all changed over the last decade. The CCAM Team has deconstructed laryngoscopy and tracheal intubation, taking all these changes into account, describing how the two-curve theory can be used to guide a three-stage, deliberate approach to TI.
Pre-oxygenation: There is emerging evidence that non-invasive ventilation may be superior for pre-oxygenation. If NIV is not used, pre-oxygenation should comprise head-up positioning, a tight-fitting face mask with PEEP and careful ventilation during the onset of neuromuscular blockade.
Videolaryngoscopy: There is good evidence that VL is superior to direct laryngoscopy. It should be used routinely for the first attempt at tracheal intubation.
Introducers: There is good evidence that the use of a bougie or stylet improves intubation success in critically ill patients. The BOUGIE trial, a multicenter, unblinded, randomised investigation involving 1106 critically ill adults undergoing first-attempt tracheal intubation, found no statistically significant difference in first-pass success rates between the bougie group and the stylet group.
Cricoid force: There is insufficient evidence to advise for or against the use of cricoid force. If it is used, it should be released in case of difficulty with airway management.
Apnoeic Oxygenation: There is no evidence to support the use of apnoeic oxygenation during attempts at intubation.
Known or suspected cervical spine injury: Patients should be positioned in a head-neutral position, which usually requires the use of an occipital pad/pillow. Cervical collars interfere with laryngoscopy and should be removed. The use of manual in-line stabilisation increases the difficulty of tracheal intubation and there is little evidence that it decreases secondary spinal cord injury. It should be removed in cases of difficult airway management.

Traditional laryngoscopy teaching includes the maxim that the oral, pharyngeal and tracheal axes must be aligned to achieve line of sight under the upper incisors to the glottis.
MRI studies show poor alignment of these axes, even in good intubating positions.
The mechanics of airway management can better be understood with two anatomical curves:
Primary (Oropharyngeal) Curve: This curve originates in the oral cavity, follows the superior surface of the tongue, and extends through the oropharynx, terminating in the laryngeal vestibule—the anatomical space situated between the epiglottis and the glottis.
Secondary (Pharyngo-glotto-tracheal) Curve: Beginning at the laryngeal vestibule, this curve continues downwards, following the trajectory of the trachea.
The primary and secondary curves meet at an inflection point within the laryngeal vestibule. The tangent of the line joining the two curves at the inflection point is known as the vestibule axis. In the neutral position, this axis is up-sloping, making it more difficult to visualise the glottic opening and pass a tracheal tube.
Flattening the Curves – Patient Positioning – The Ear-to-Sternal Notch Position
MRI studies show that head tilt (extension of the upper cervical spine) causes flattening of the primary curve, and the addition of head lift (flexion of the lower cervical spine) creates flattening of both curves
These airway manoeuvres (which have also been dubbed “flextension”) create the ear-to-sternal notch position
They also bring the vestibule axis into a flat or down-sloping position
All these changes create a marked improvement of line-of-sight to the glottis
The ear-to-sternal notch position has been found to improve line of sight in obese and non-obese patients, adults and children, and is the optimal position for tracheal intubation.


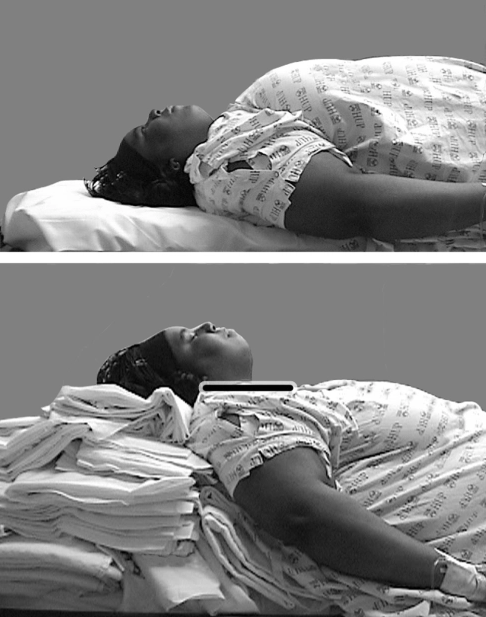
Flattening the Curves – Patient Positioning – Ramping Strategies
In obese patients, the large fat pad on the upper back prevents head elevation to the ear-to-sternal notch position without ramping.
Ramping can be acheived using blankets or pillows, or a specialised ramping system such as the Troop elevation system.

Flattening the Curves – Airway Manoeuvres
A video showing the effect on the airway of lower cervical spine flexion
Acknowledgement: AIME Airway
Dynamic MRI showing the effect on the airway of upper cervical spine extension
Acknowledgement: Chris Kelly
Flattening the Curves – Laryngoscopy
Direct and standard VL blades flatten the primary curve by compressing and displacing the tongue. Lifting these blades in the axis of the handle helps to flatten the vestibule axis and secondary curve.
Hyperangulated VL (HAVL) blades follow the primary curve and do not significantly alter its shape. Lifting these blades vertically helps to flatten the vestibule axis and the secondary curve.
Comparative Analysis of Standard and Hyperangulated Blade Video laryngoscopes
Standard Blade VL
Standard Blade VL
- Examples: Storz C-Mac™ standard blade, Glidescope™ MAC blade
- Compress and displace tongue and soft tissues to flatten the primary curve
- These devices benefit from patient positioning similar to that used for direct laryngoscopy to achieve optimal alignment of the airway curves
- They can be used with or without an introducer
Hyperangulated VL
Hyperangulated VL
- Examples: Storz C-Mac™ D-blade, Glidescope™ LoPro™
- Conform to the primary curve enabling visualisation around it
- Advantageous when there is anterior column pathology impeding compression or displacement, or when posterior column issues cause primary and secondary curve positioning.
- Due to their trajectory, must be used with an introducer
Flattening the Curves – External Laryngeal Manipulation (ELM)
In some patients, ear-to-sternal notch positioning is limited.
In these cases, an up-sloping vestibule axis can be flattened using external laryngeal manipulation (also known as bimanual laryngoscopy), which can improve visualisation of the glottis and facilitate passage of the tube.

Stage 1: Laryngeal Exposure
- During stage 1, we are essentially negotiating the primary curve around the tongue. This is done in different ways depending on the device used (see Table below).
- Epiglottoscopy – the first landmark is the epiglottis
- Lift the epiglottis – gain a view of the glottis by either lifting the epiglottis directly (straight blade) or by deploying the hyo-epiglottic ligament with pressure in the vallecula (all other devices).
- Optimise view – lift the tongue and other anterior column tissues with upward force in the axis of the handle of the laryngoscope, or vertically if using hyperangulated videolaryngoscopy (HAVL).
- Optimise view – external laryngeal manipulation (not BURP – Back Up Right Pressure): intubator uses right hand to manipulate the larynx into view, assistant then holds larynx in the same position
- Optimise view – head lift
- Optimise VL view – create view with glottis in top half of screen – back off, tilt down (especially for HAVL).
Stage 2: Delivery of the Tube or Bougie to the Glottic Opening
- Performing stage 2 also depends on the device used: standard geometry and straight blade laryngoscopes, which flatten or bypass the primary curve, allow for tube delivery without an introducer
- For HAVL devices, which follow the primary curve, a curved introducer is mandatory (exception: channelled devices)
- During HAVL, place the glottis in the top half of the screen. This allows for visualisation of the tube or bougie approaching from below and eases their passage towards the glottis (by flattening the secondary curve).
The table below summarizes the use of different laryngoscopes across the first two stages of tracheal intubation:

Stage 3: Advancing the tube or bougie into the trachea
- Stage 3 offers pitfalls depending on the device used: during HAVL, the tube or bougie approaches the glottis at an angle where it is likely to impact on the anterior tracheal wall
- Bimanual laryngoscopy can flatten the vestibule axis, facilitating tube advancement
- Tube delivery is also helped by turning bevelled tubes 90 degrees clockwise at the level of the vocal cords (‘Right Turn for Rings’), and reverse loading of the tracheal tube onto a stylet.
- If the tube won’t pass over the bougie, rotate 90 degrees anti-clockwise (Bougie Left Turn, BLT), the chances are the bevel is stuck in the right piriform fossa
Tube Rotation Techniques:
‘Right Turn for Rings’: For bevelled endotracheal tubes, rotating the tube 90 degrees clockwise at the level of the vocal cords can help navigate past the tracheal rings and overcome impaction.
‘Bougie Left Turn’ (BLT): If the tracheal tube fails to pass over a bougie or bronchoscope, rotating the tube 90 degrees anti-clockwise can resolve the obstruction.
